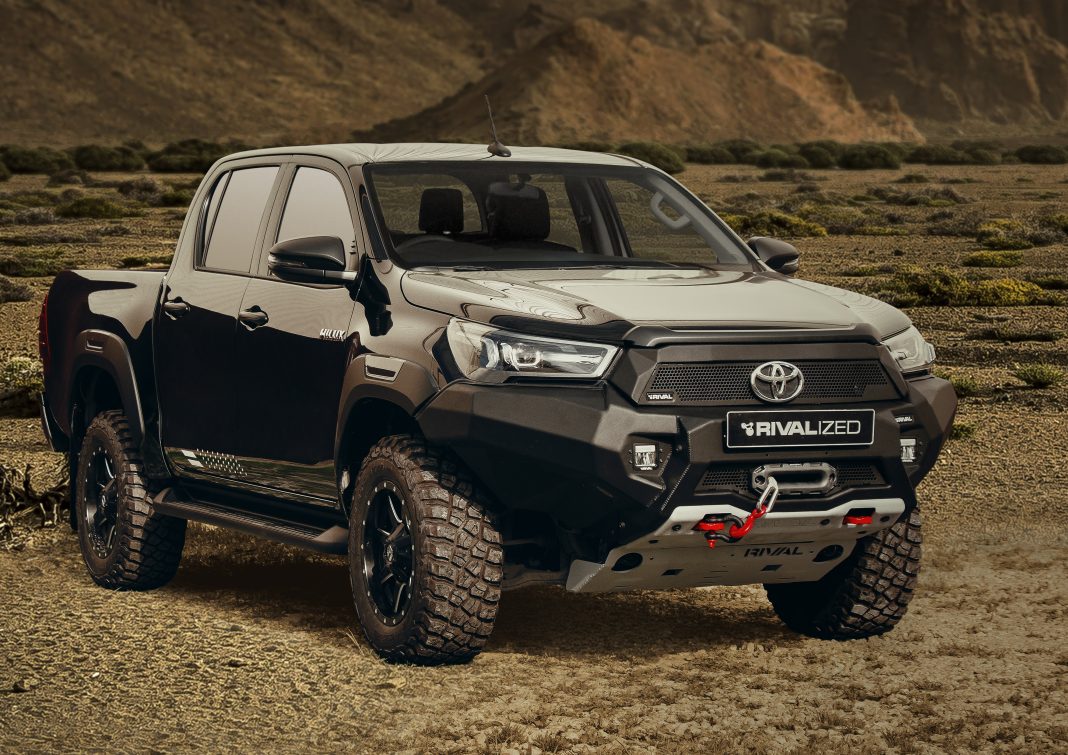
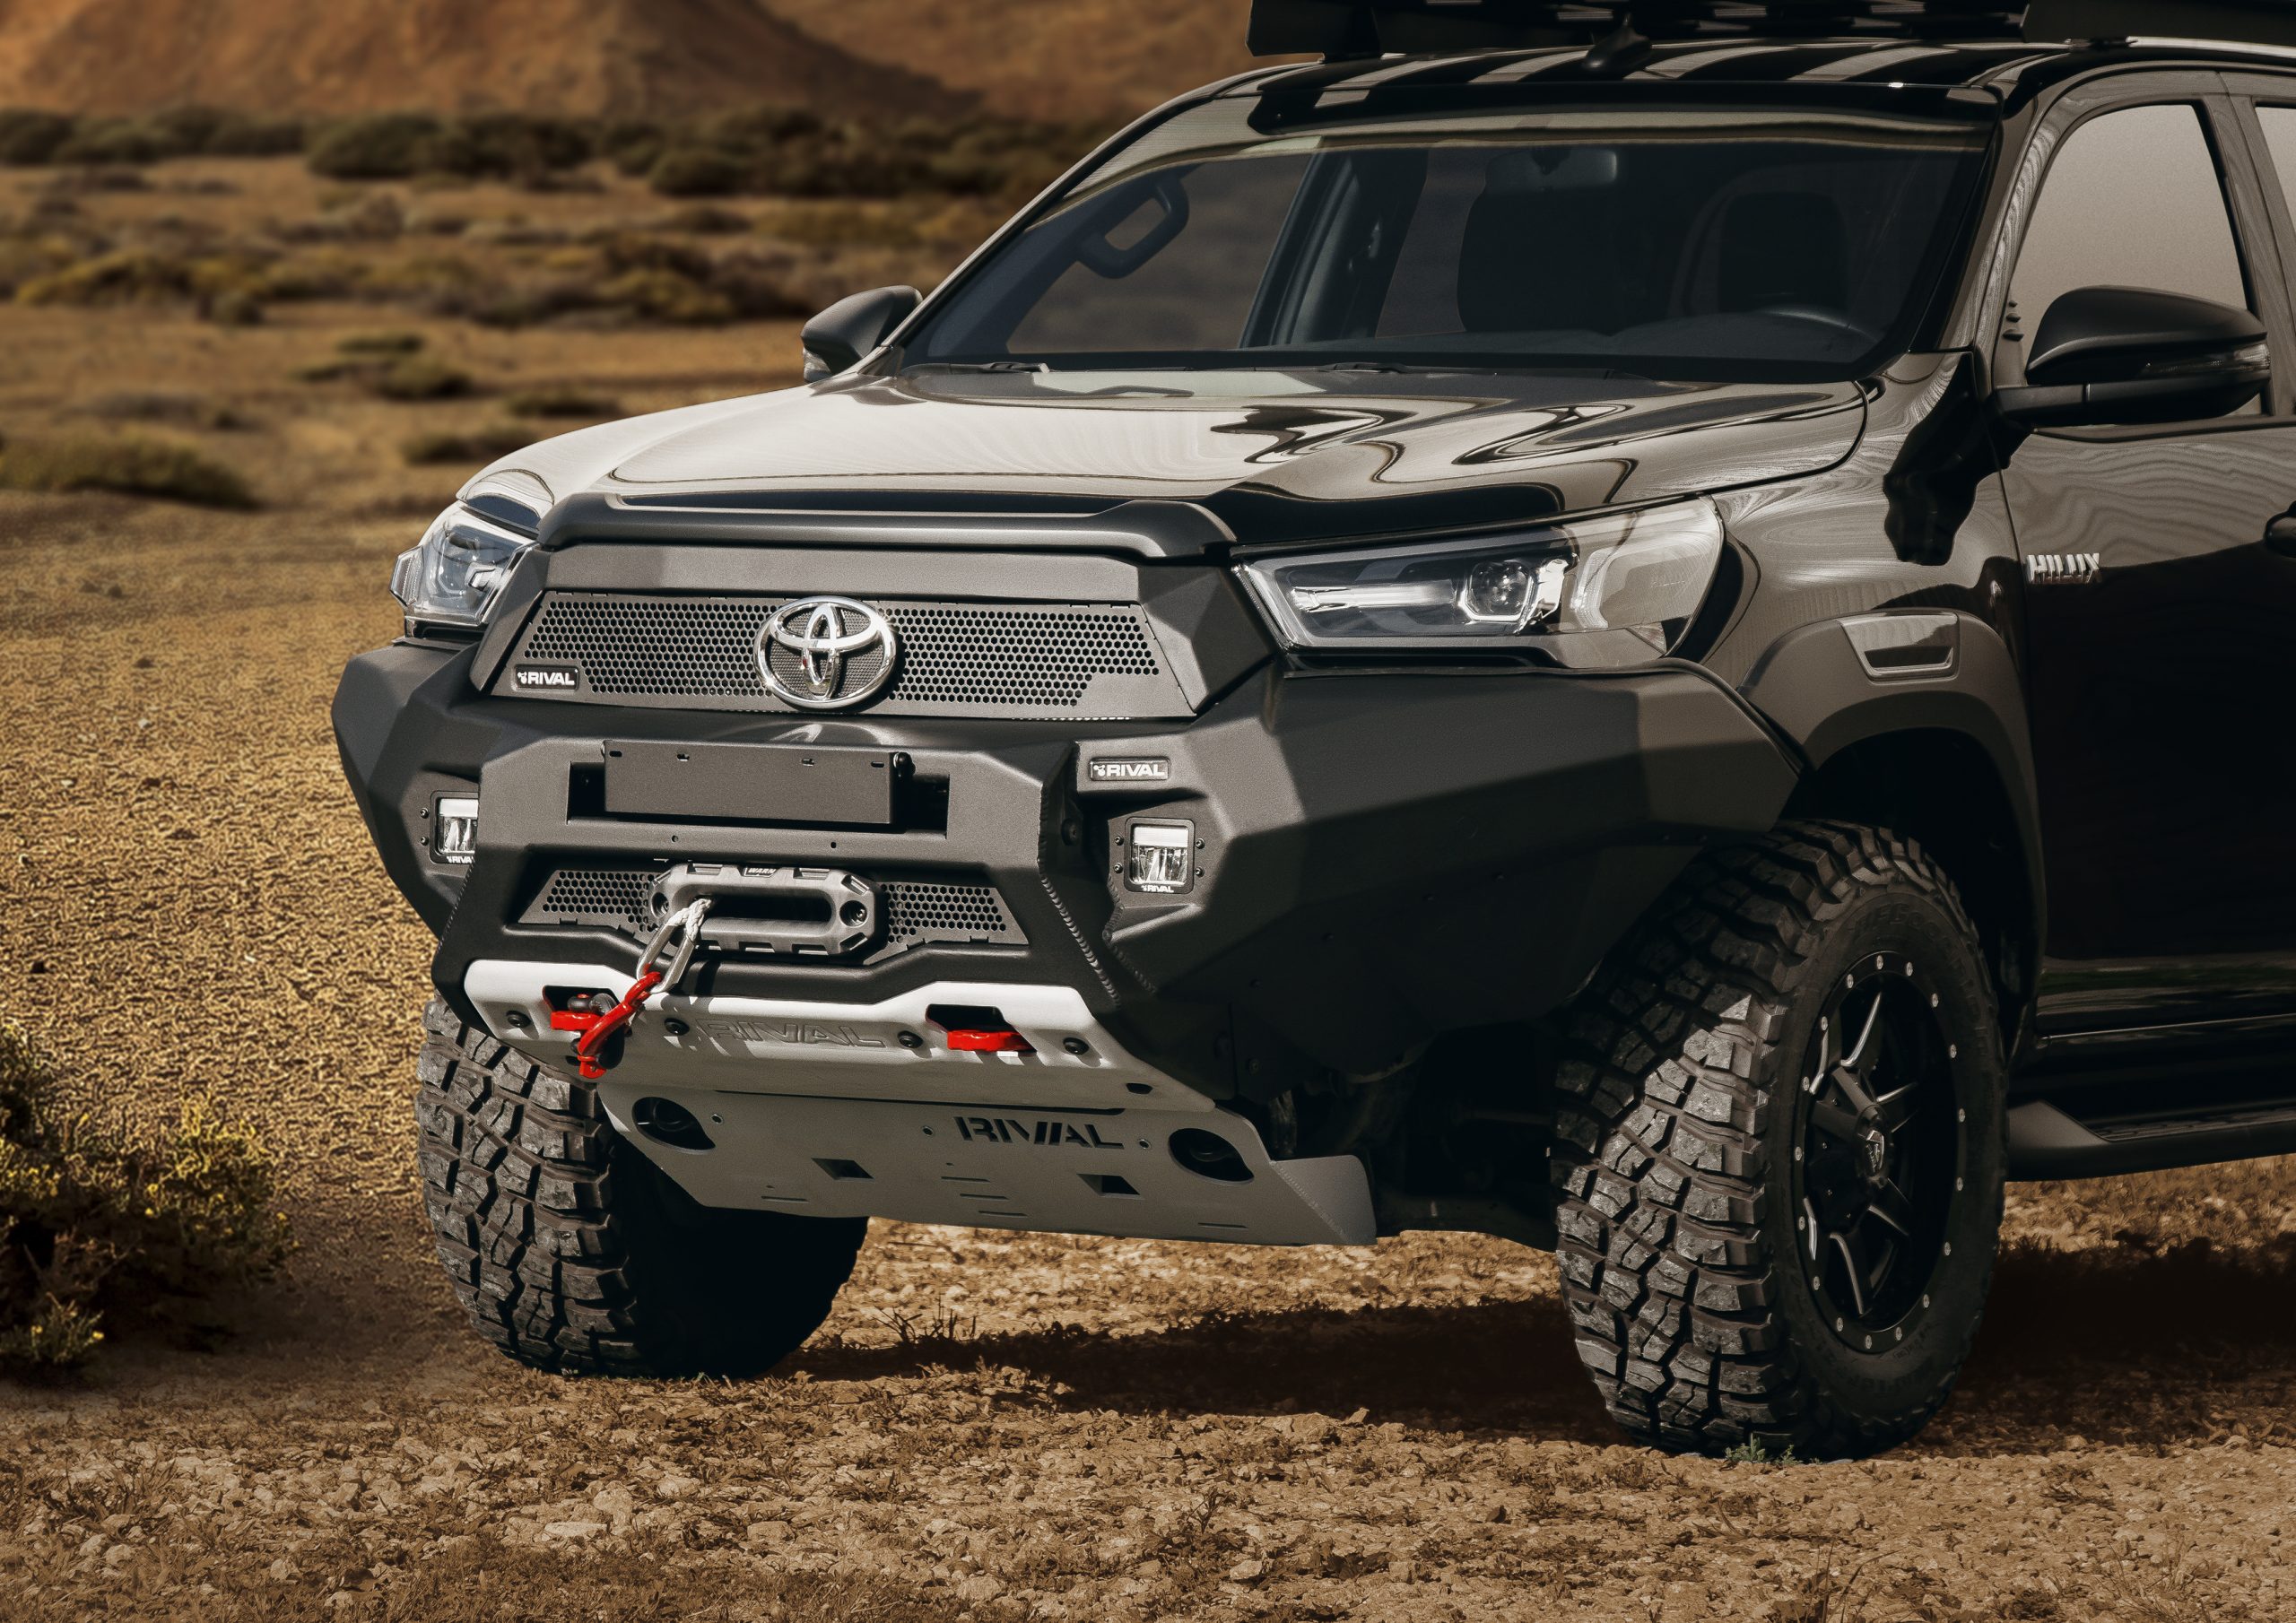
If you are interested how to install the Rival Front Bumper, aluminum 2D.5722.1 for Toyota Hilux. Best Ride provides you with complete instructions how to install the product, so that you or your mechanic can follow the appropriate steps.
CAUTION !
To reduce the risk of serious injury or damage , please read and understand all instructions and procedures before attempting to install or use this product . Safety glasses must be worn at all times during installation or maintenance of this product . Ensure all mounting bolts are tensioned after 1000 kms and periodically there after.
NOTICE!
Whilst the bumper adds additional protection to your vehicle , precautionary measures still need to be taken to avoid damage . Always drive to the conditions and your surroundings . ADR69 COMPATIBLE AIR BAG COMPLIANT
- ADR69 COMPATIBLE
- AIR BAG COMPLIANT
TECHNICAL INFORMATION
WINCH INSTALLATION
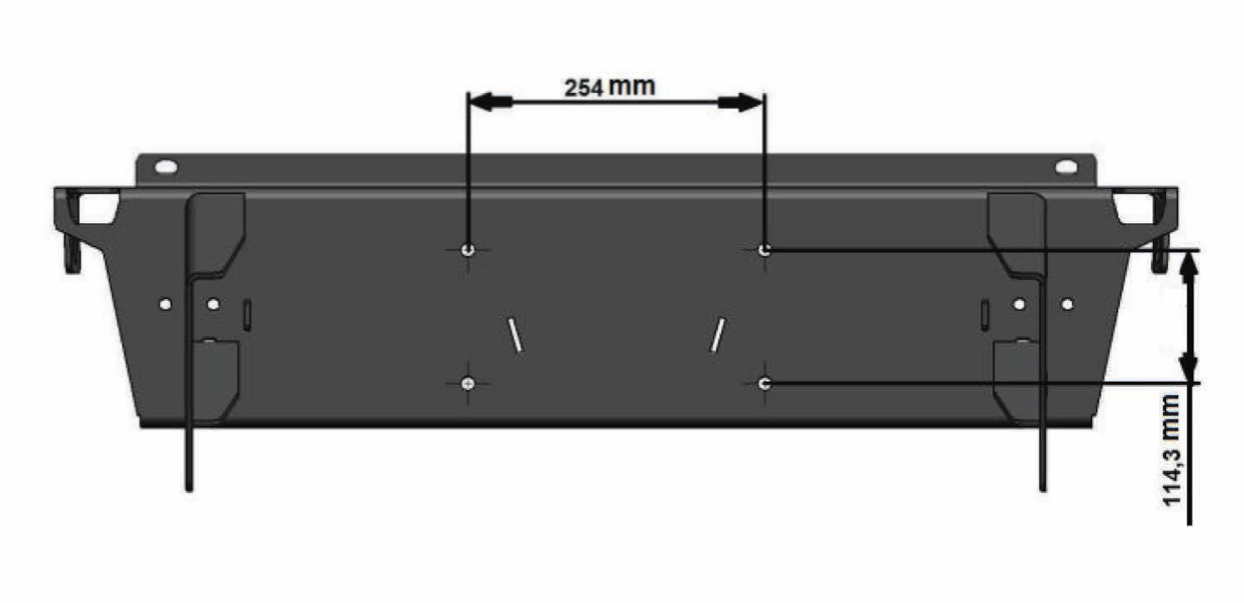
A winch with a pull capacity of up to 12000 lb can be installed with the RIVAL Bumper . It is not advisable to exceed this pulling capacity since damage , injury or death may occur where the 12000lb recommended capacity is exceeded . There is a special license plate holder supplied with the bumper which will provide access to the winch.
Winch measurements :
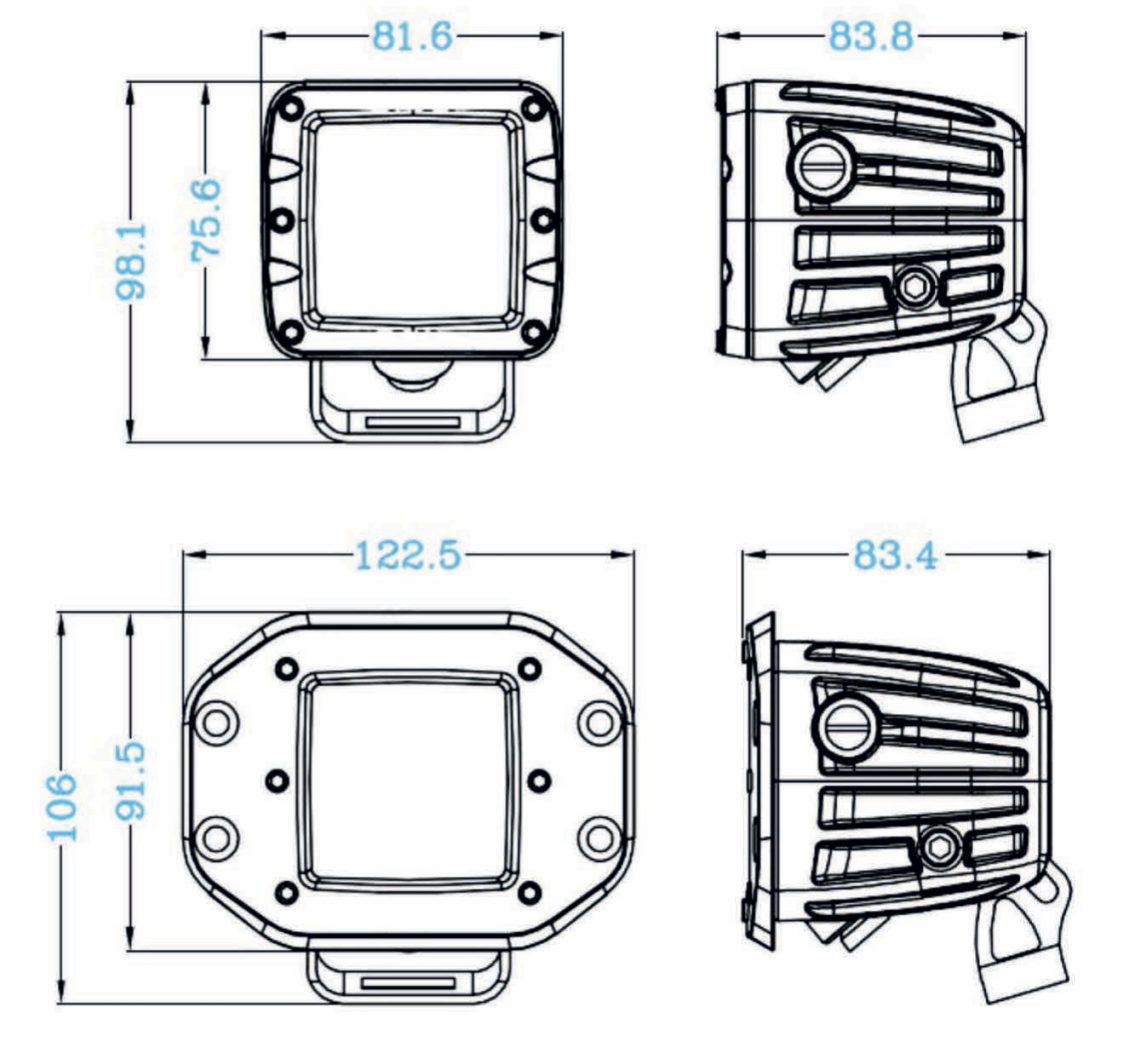
Compatible with LED size below :
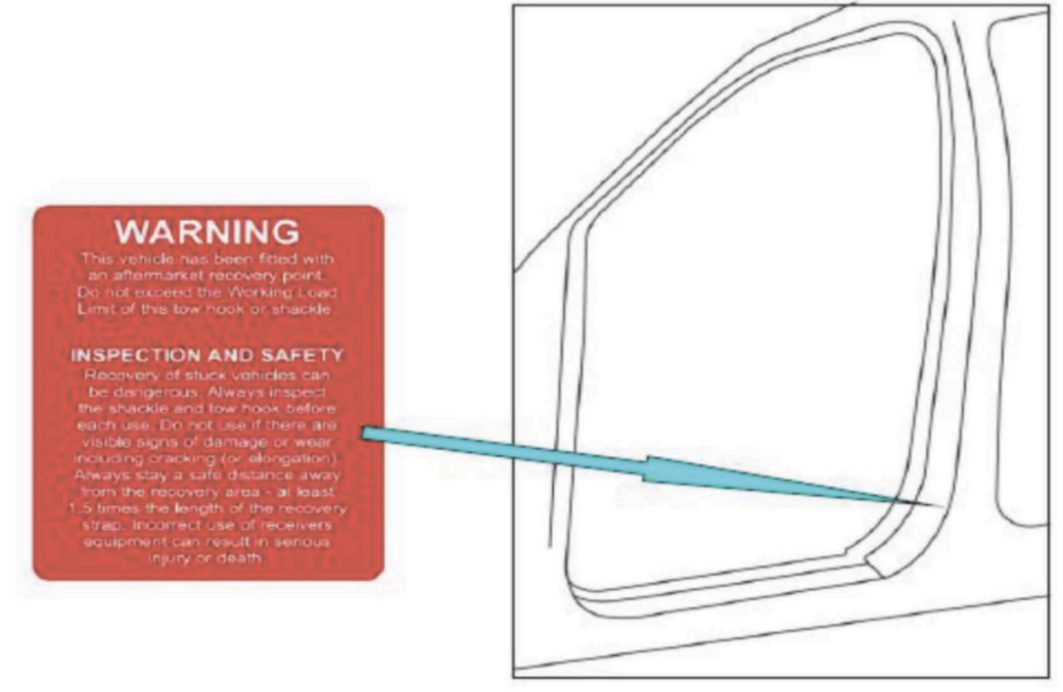
* RECOVERY POINTS WARNING!
 Do not exceed the Working Load Limit of these recovery points or shackle .
INSPECTION AND SAFETY
Recovery of stuck vehicles can be dangerous . Always inspect the shackle and recovery points before each use . Do not use if there are visible signs of damage or wear including cracking ( or elongation ) . Always stay a safe distance away from the recovery area – at least 1.5 times the length of the recovery strap . Incorrect use of receivers equipment can result in serious injury or death.
Always use recovery points as a matched pair teamed with an equalising bridle during any recovery situation.
- Please attach this ” Warning ” label to the door aperture.
SAFETY NOTICE!
- The RIVAL Bumper is designed to compliment the use and design of the specified vehicle under conditions specified by the car manufacturer.
- While driving the vehicle at any speed , collision with any other vehicle , animal or object must always be avoided.
- Following any collision with any other vehicle , animal or object , the RIVAL Bumper and the vehicle must be inspected by a specialized or suitably qualified vehicle repairer for possible damage to the components and assemblies in order to confirm suitability for further use of the vehicle.
- It is strongly recommended that you do not operate a vehicle with a damaged bumper or its components . In the case of damage , please contact the nearest RIVAL dealer.
- The operation of a vehicle where the bumper is not properly attached and fastened to the vehicle , or where the bumper has been damaged , is extremely dangerous and must be avoided at all cost.
- It is recommended that you carry out regular inspections of all the bumper elements such as all bolts, wires, connectors.
- A winch with a pull capacity of up to and including 12000 lb can be installed with the RIVAL Bumper.It is not advisable to exceed this pulling capacity since damage , injury or death may occur where the 12000lb recommended capacity is exceeded . The Rival bumper provides standard 4 1/2 ” x10 ” mounting holes .
INSTALLATION NOTICE
- Personal safety during the installation process must be adhered to at all times .
- Estimated time for installation : 4 hours .
- The RIVAL Bumper must be mounted and affixed to the vehicle according to this installation manual and the use of personal safety equipment is highly recommended .
- Do not install this bumper on vehicle models other than those allowed in this manual .
- Check state and local highway safety laws regarding permitted bumper types and heights.
NOTE : if the bumper is to be color coded it is advised to test fit before color coding . RIVAL is not liable for color coding cost , it is the installers ‘ responsibility to check the fitment and alignment before color coding.
ADR69 AND AIR BAG SYSTEM The Rival bumper has been tested and certified to be compatible with ADR69 and will not affect the operation of the Air bag System on this vehicle . This product or mounting brackets must not be modified in any way , and must be fitted in accordance with the installation instructions .
REQUIRED TOOLS
- Basic tool kit
- Torque wrench
- Crosspoint and flat head screwdriver
TORQUE SETTING
- M6 – 9 Nm
- M10 – 30 Nm
- M12 – 77 Nm
PARTS LISTING
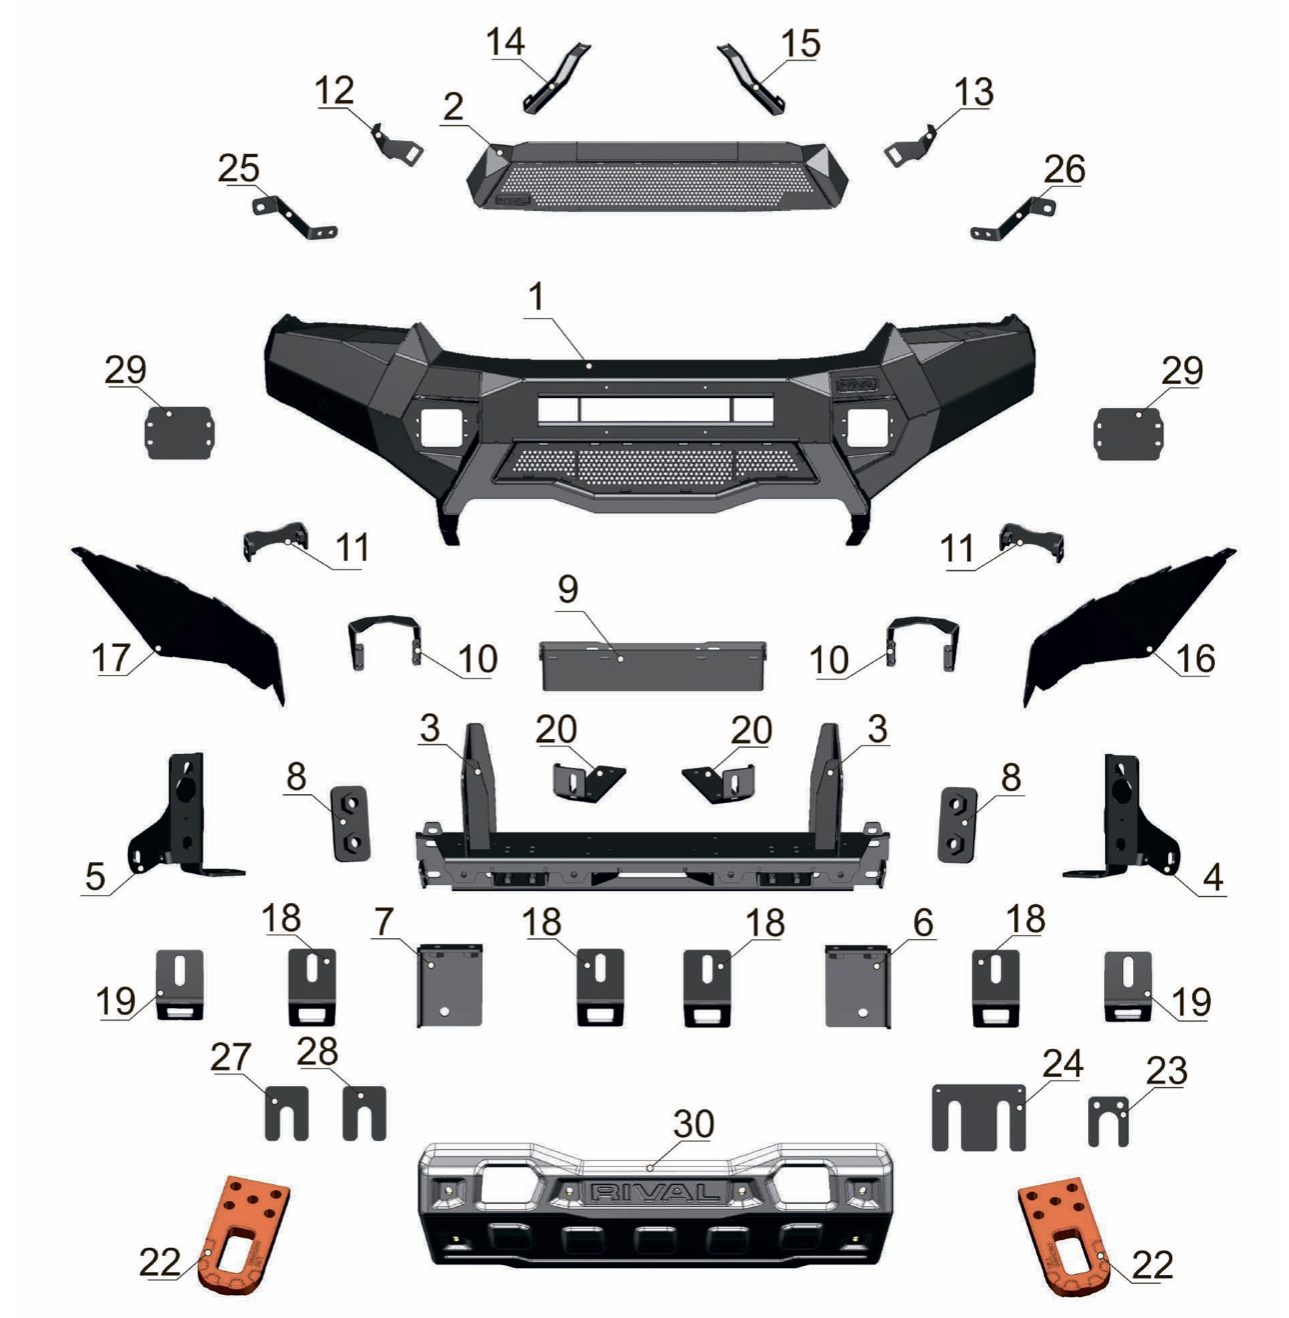
- Aluminum bumper body – Qty 1
- Grill – Qty 1
- Winch bracket – Qty 1
- Support bracket left – Qty 1
- Support bracket right – Qty 1
- Left bash plate bracket – Qty 1
- Right bash plate bracket – Qty 1
- M12 nut plate – Qty 2
- License plate bracket – Qty 1
- LED bracket – Qty 2
- Parking sensor holdi – Qty 2
- Right side grill bracket – Qty 1
- Left side grill bracket – Qty 1
- Right top side grill bracket – Qty 1
- Left top side grill bracket – Qty 1
- Flap left – Qty 1
- Flap right – Qty 1
- Front bash plate bracket – Qty 4
- Rear bash plate bracket – Qty 2
- Left winch hawse bracket – Qty 1
- Adjusting plate 2mm – Qty 1
- Adjusting plate 4mm – Qty 2
- LED light cap – Qty 12
- Bash plate – Qty 6
- Right winch hawse bracket – Qty 1
- Recovery points – Qty 1
- Adjusting plate – Qty 6
- Recovery points adjusting plate – Qty 6
- Right headlight washer bracket – Qty 2
- Left headlight washer bracket – Qty 1
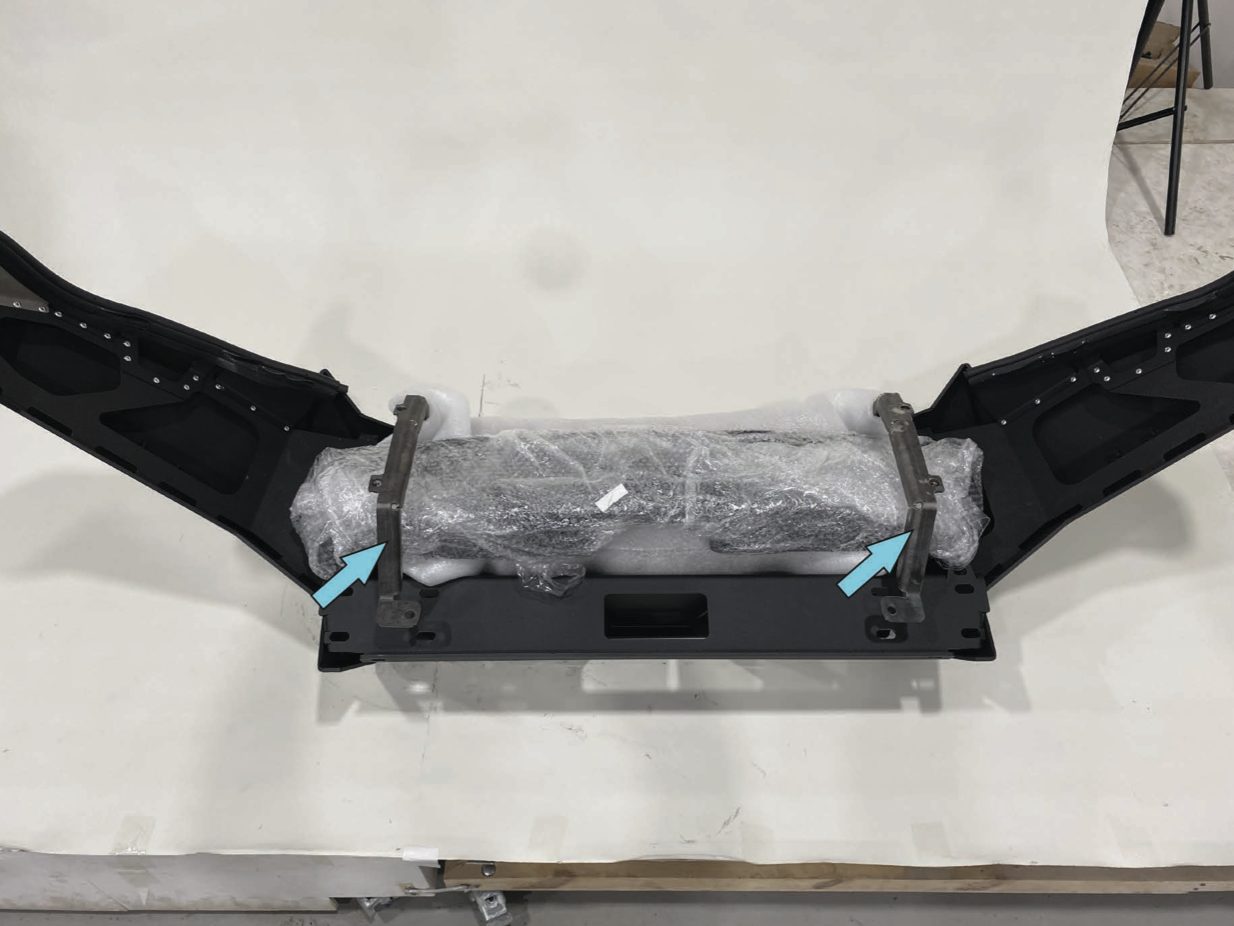
INSTALLATION PROCEDURE
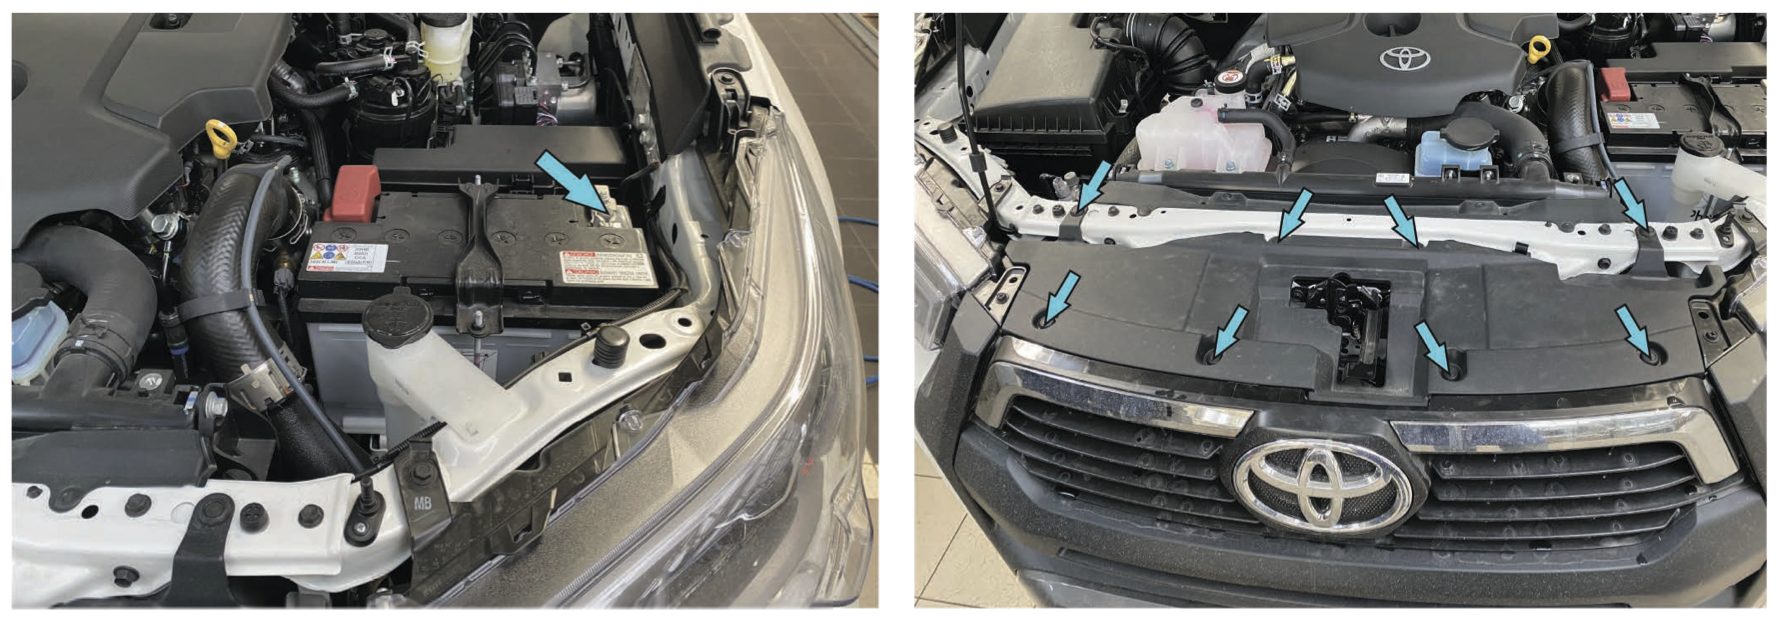
- 1. Open the hood. Disconnect terminal “=” from the vehicle battery.
- 2. Remove the plastic pad clip. Dismantle the clip.
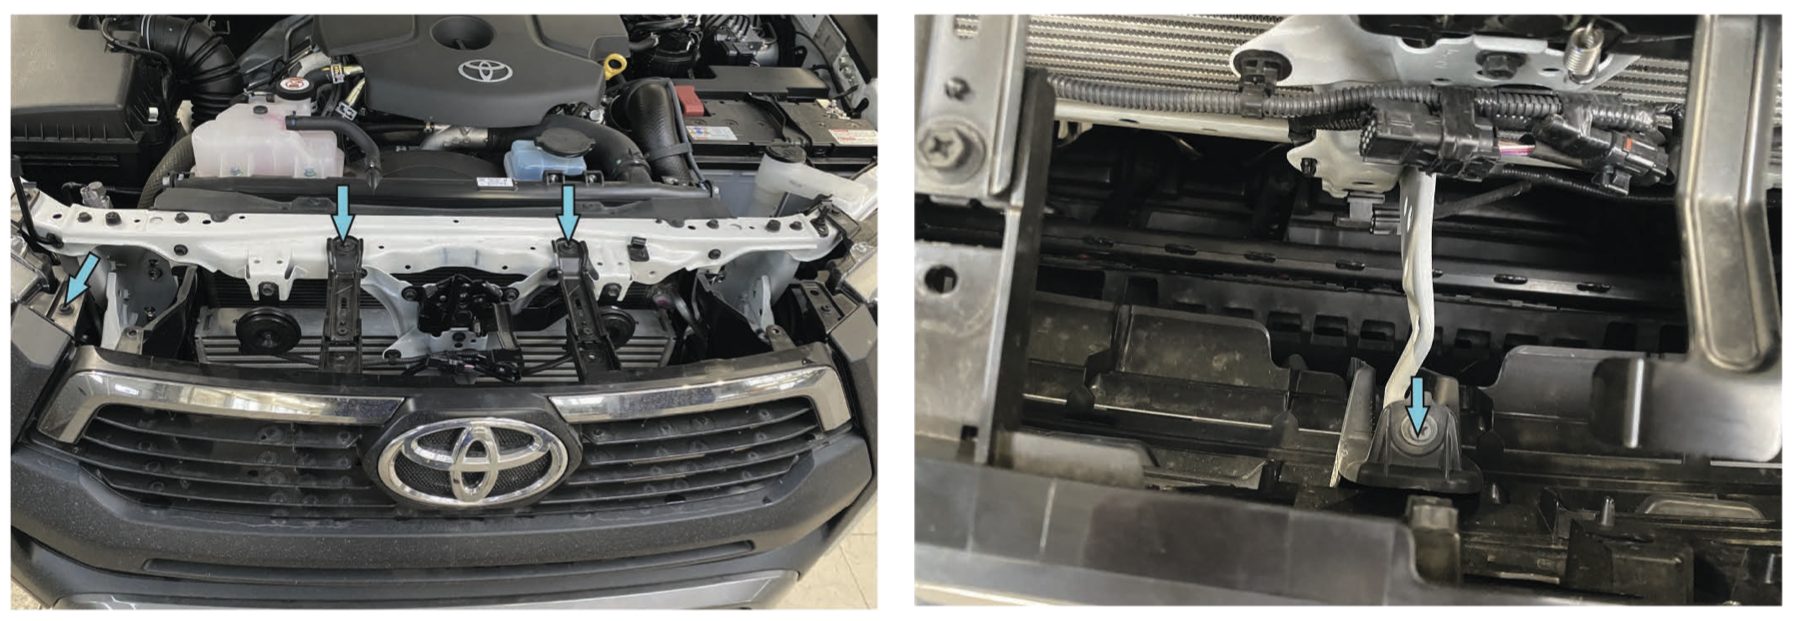
- 3. Remove upper grill retaining screws.
- 4. Unscrew the screw fixing the bumper in the central part.
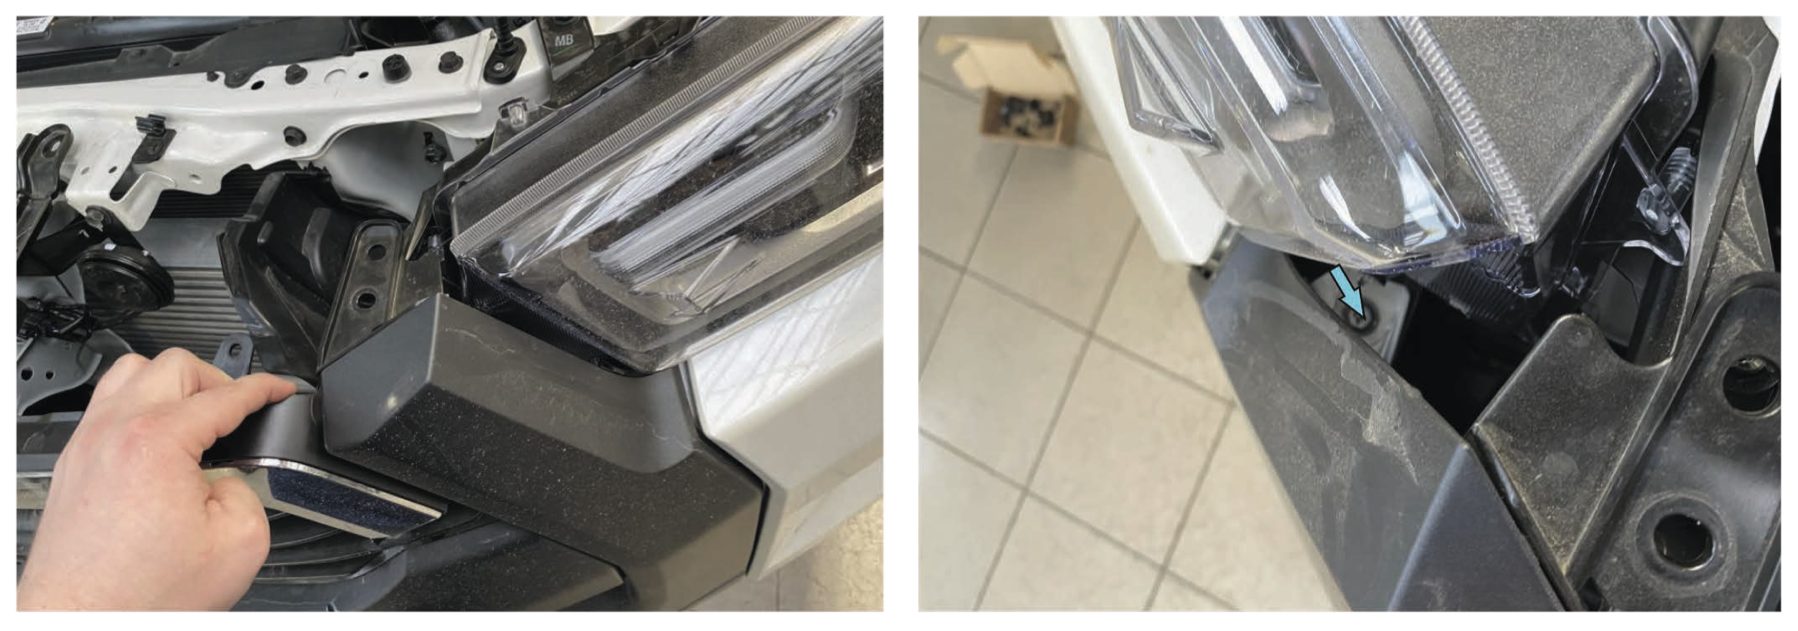
- 5. Bend the edges of the bumper in the area of the headlights.
- 6. Remove the screws in the area of the head lights.
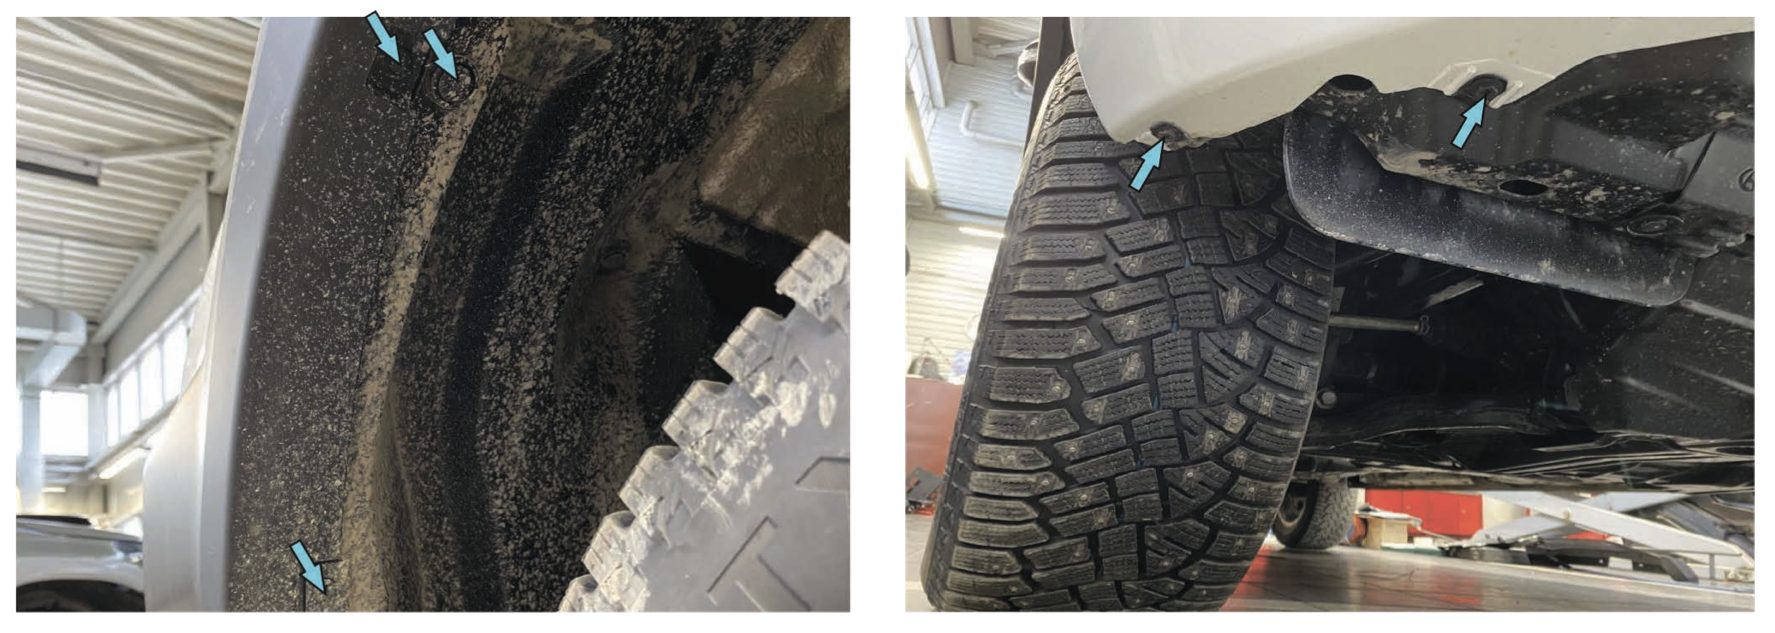
- 7. Remove all scrivets retaining bumper along inside edge of wheel arches.
- 8. Remove the screws securing the lower side of the bumper.
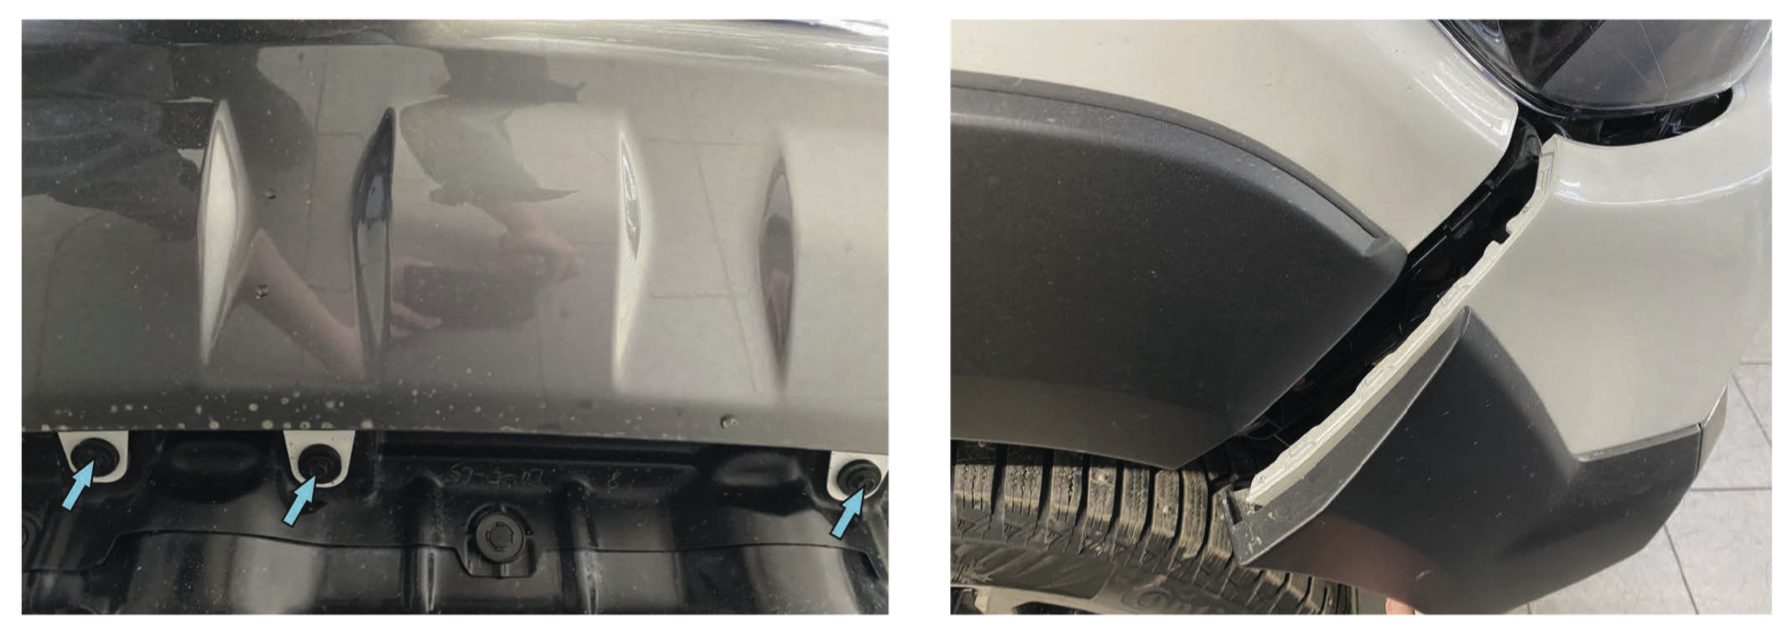
- 9. Remove the screws securing the lower center part of the bumper.
- 10. Unfasten the sides of the bumper.
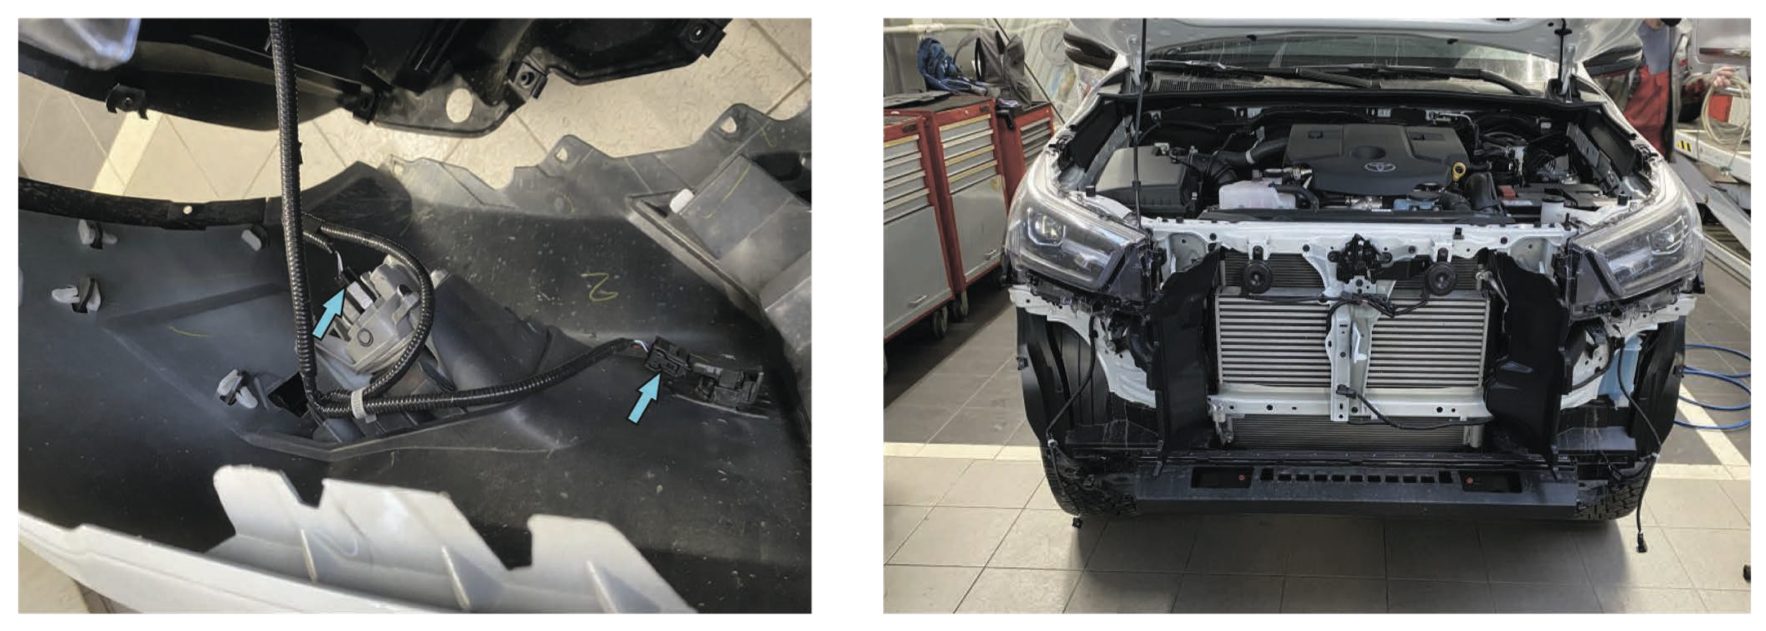
- 11. Disconnect the connectors of the fog lights and parking sensors.
- 12. Remove factory bumper.
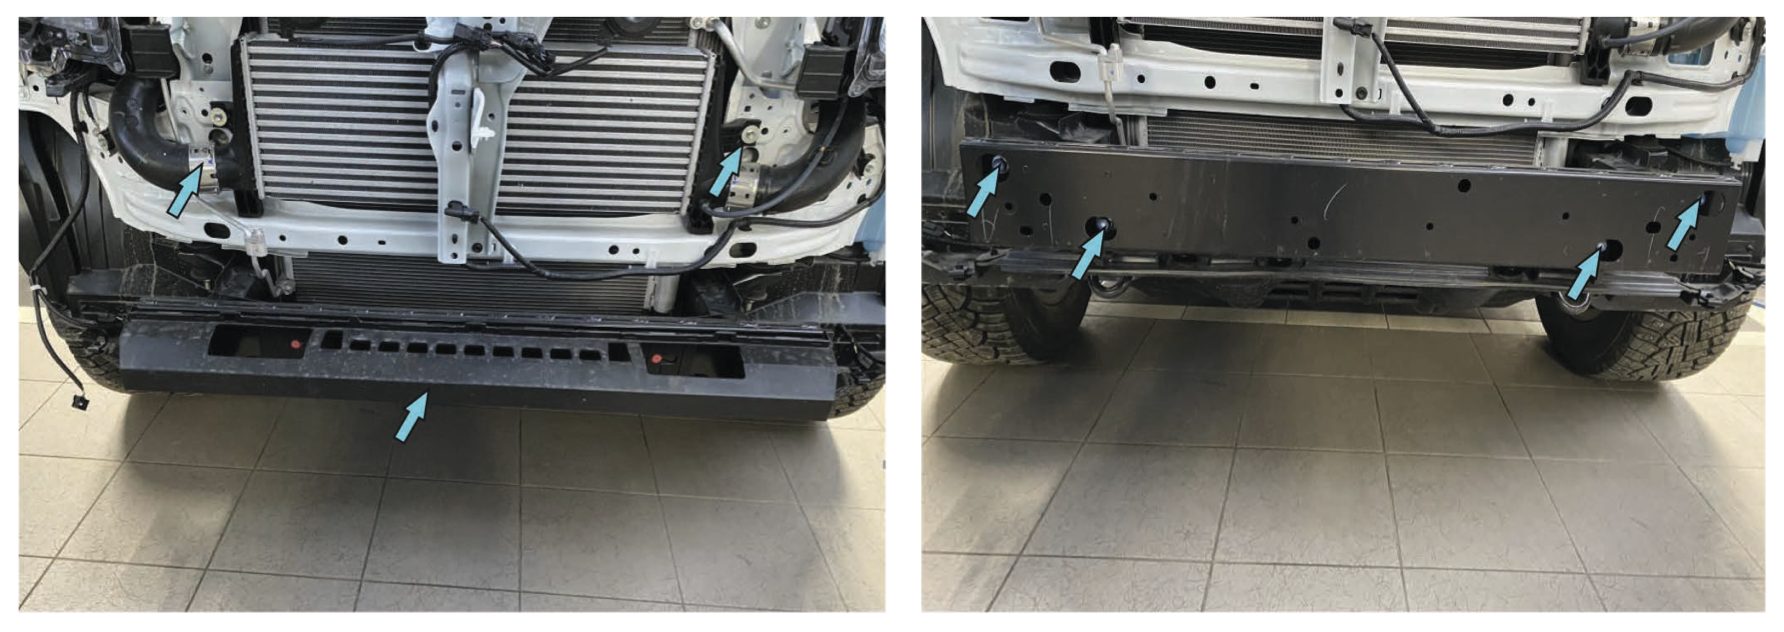
- 13. Forcefully pull the plastic crush absorber towards you and remove it. Remove plastic side
- 14. Remove 4xM10 bolts fixing crash beam to chassis. Set aside for re-use later on. Remove crash beam.
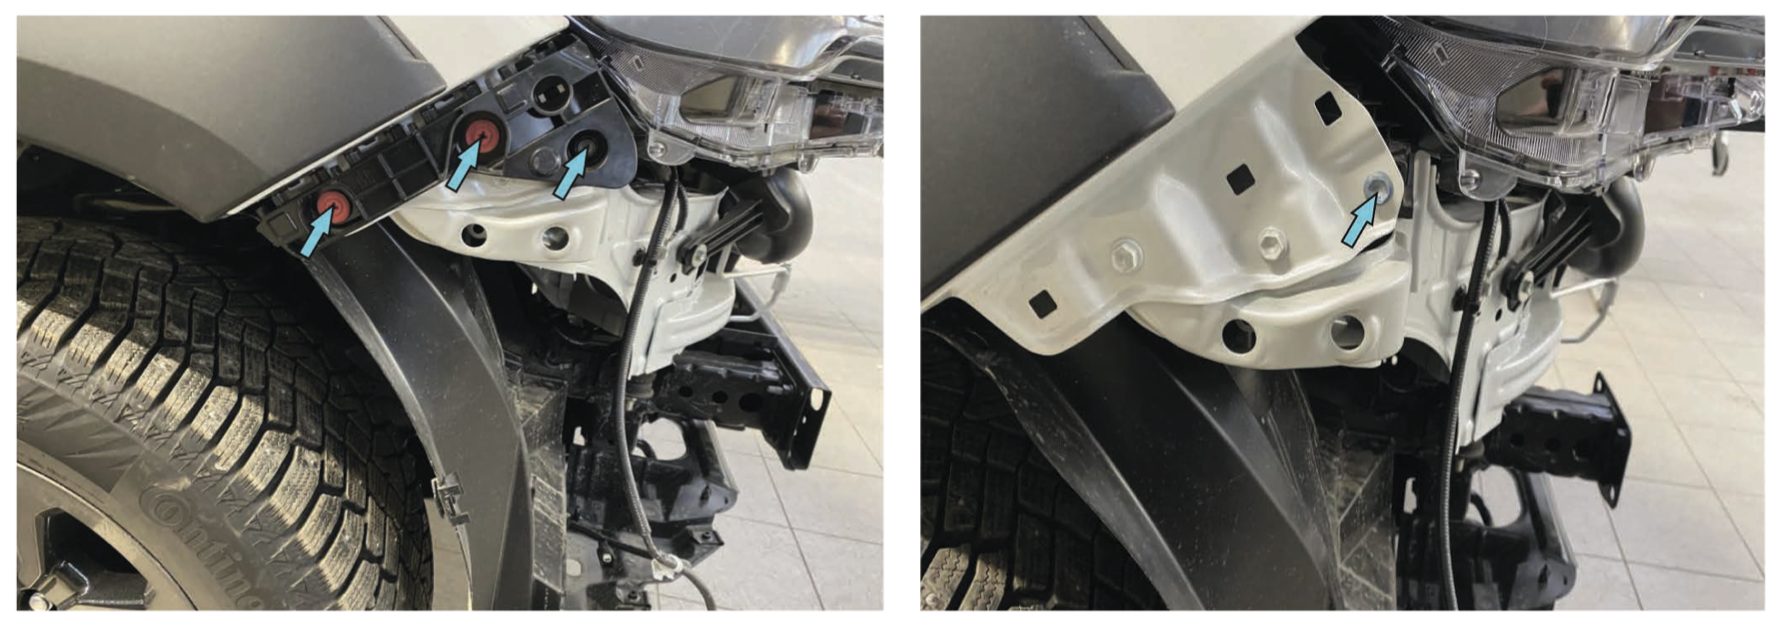
- 15. Remove M6 bolts and scrivets.
- 16. Screw bolt in to fix light. Remove plastic side fittings.
Winch bracket installation

- Place M12 nut plate (pos.8) inside the frame.
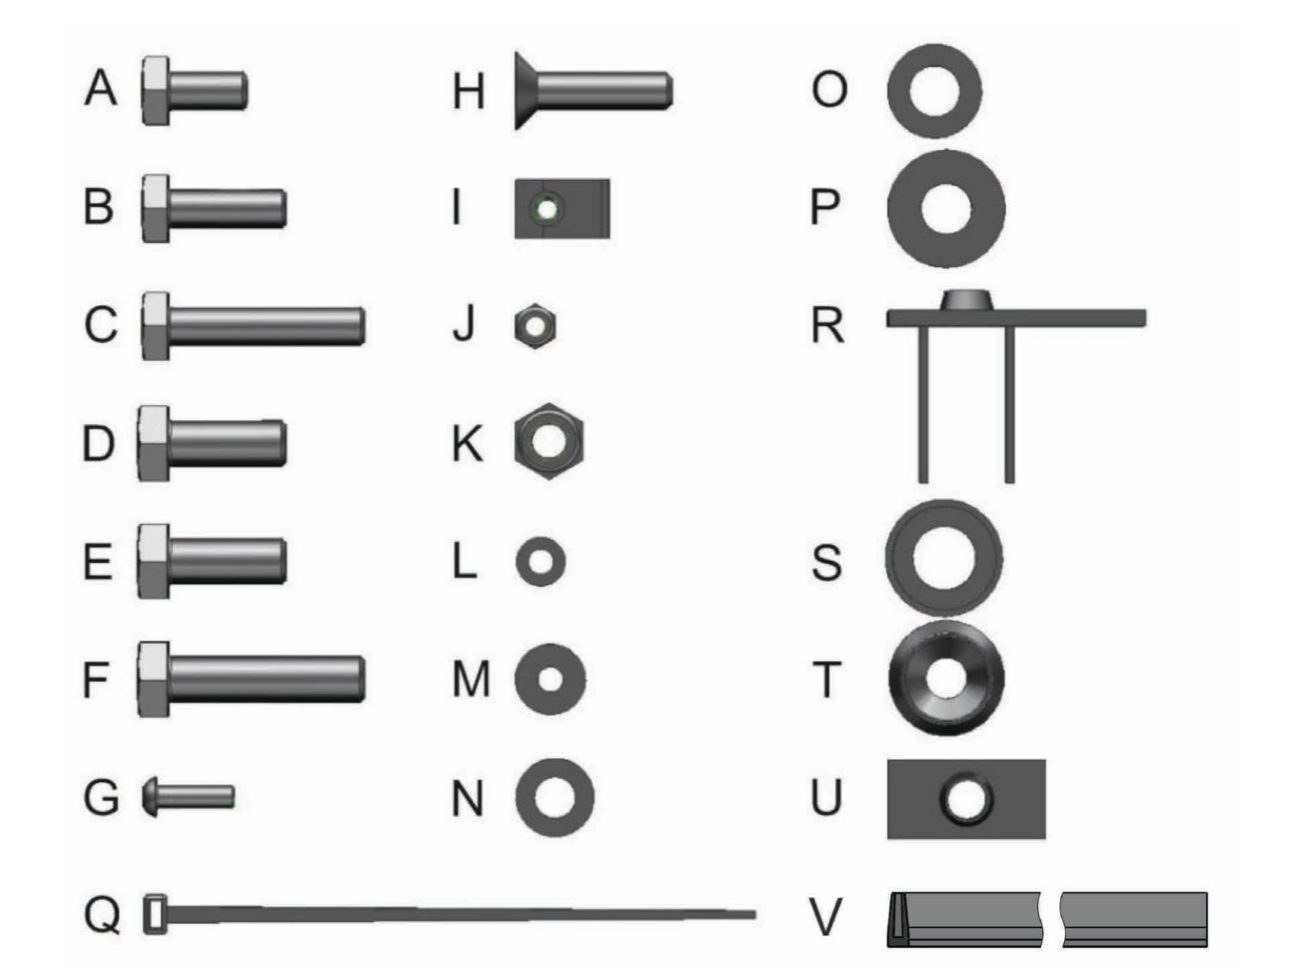
- 18. Fit support mounting bracket (pos. 4) through the holes in frame to M12 nut plate (pos.8), using bolt N12x30 (pos. E) and washer 12mm (pos. O). And use bolt M12x1,25×30 (pos. D) with penny washer 12mm (pos.P) to fix to factory mounting point in frame.
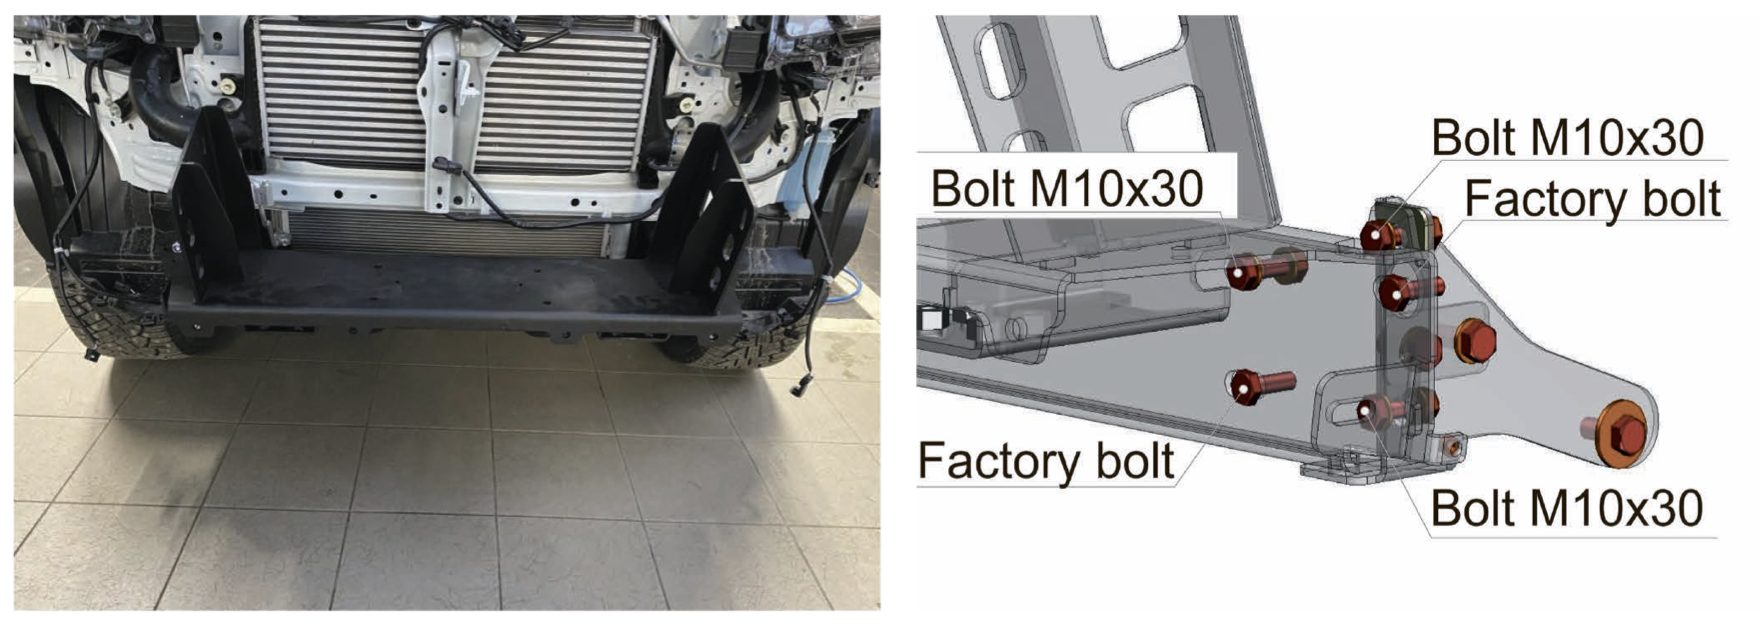
- 19. Place winch bracket (pos.3) to the vehicle body.
- 20. Fix winch bracket (pos.3), using bolt M10x30 (pos. B) with washer 10mm (pos. N), nut M10 (pos. K) and factory bolts.

- 21. Fix support mounting brackets (pos. 4 and pos.5) to winch bracket, using M10 nut plate (pos. U), bolt M10x20 (pos. A) and washer 10mm (pos. N).
- 22. Align the winch bracket and tighten the bolts in the specified order.

- Install left and right bash plate bracket (pos.6 and pos. 7), using bolt M10x30 (pos. B) and washer 10mm (pos. N).
- Install recovery points (pos. 22), using bolt M12x70 (pos. F) and washer 12mm (pos. O). For installation on a vehicle with non-LED head lights, put 3 recovery points adjusting plate (pos. 24) between recovery points and the winch bracket.
Steps 25-26 (if winch is to installed).

- Fix left and right winch fairlead brackets
- Install winch on winch fairlead brackets. (pos.20, pos.21) on winch bracket.
Steps 27-30 (if there are parking sensors).

- Remove parking sensors from factory bumper.
- Locate knock-outs for parking sensors on the bumper body (pos.1) and knock them out by a hammer.

- Install countersunk washer (pos. T)
- Put parking sensor in bumper body and fix them, using parking sensors holding brackets (pos.11), screw M6x20 (pos.G) and washer 6mm (pos. L).
Steps 31-34 (if there are headlight washer).

- Remove headlight washer from the factory bumper.
- Locate knock-outs for headlight washers on the bumper body (pos.1) and knock them out by a hammer.

- Install headlight washer brackets (pos.25, pos 26) on bumper body, using screw M6x20 (pos. G), nut M6 (pos. J) and washer 6mm (pos.
- Fix headlight washer to brackets (pos.25, pos 26), using factory bolt.

-
-
- Attach license plate backet (pos.9) to bumper body, using screw M6x20 (pos. G ) nut M6 (pos. J) and washer (pos. L).
-
-
-
- Fix your aftermarket LED cudic ligfts brackets (pos.10). This brackets are not compati- ble with flush mount LED lights (parts number 20.0041.1, purshased separately). Install LED lights or LED caps (pos.29). using screws M6 (pos.G). nuts M6 (pos.J) and washers 6mm (pos.L).
-
Steps 37-42 for installation on vehicle with LED headlamps.

- 37.Remove the seal from the bumper. Pay attention to the slots in the brackets.
- 38. Mark the spots for cutting in front of the slots in brackets.

- 39. Make the cuts following the marked spots.
- 40. Bend the reinforcement of the seal where cut.

- Remove the reinforced section of the seal.
- Put the seal on the bumper.

- Install bumper body (pos. 1) onto the winch bracket (pos. 3).
- Fix bumper body using:
- a – screws M10 (pos. J), countersunk washer (pos. T), washers 10 (pos. N), nuts M10 (pos. K);
- b-bolts M10 (pos. B), washers 10 (pos. N) and nuts M10 (pos. K). Align the bumper body with the vehicle. Tighten all the hardware.

- Fit U-nut M6 (pos. I) on flaps (pos.16, pos. 17).
- Install flaps (pos.16, pos. 17), using screw M6X20 (pos. G) and washer 6mm (pos. L).

- Push the flap to plastic fender and mark future cutting line. Cut plastic fender following the marked cutting line, using jig-saw or shears.
- Mark and drill 2 holes in plastic fender according with holes in flap.

49. Fit front bash plate brackets (pos.18, pos.19) on winch bracket, using bolt M10x50 (pos. C), nut M10 (pos. K) and washer 10mm (pos. N). For installation if there are LED headlights, put 2 adjusting plate (pos. 23) between each bash plate brackets (pos. 18, 19) and the winch bracket.
50. Put inner plate M10 with wires (pos. R) on bash plate bracket. Straighten fixed elements.
Steps 52-55 (if winch is to installed).

- Install bash plate (pos. 30) on mounting brackets, using screw M10x40 (pos. H) and washer (pos. T).
- Push hawse to lower grill on bumper. Align the mounting holes with winch hawse brackets.

- Mark contour line of hawse on grill.
- Make a cutout at 5-10 mm above the marked line.

- Install the winch hawse on the bumper using its own fasteners.
- Remove the left and right headlight mount ing screws and install the grill brackets (pos. 12 and pos.13) using the factory screws.

57. Apply glue onto inside of weatherstrip (pos. VI)
58. Stick weatherstrip (pos. V) on the bottom part of grill.

- Install the grill brackets (pos. 14 and pos.15), using screws M6x20 (pos. G) and washers 6 mm (pos. L).
- Install the grill (pos. 2) on the brackets (pos. 12, pos.15.), using screws M6x20 (pos. G) and washers 6 mm (pos. L).
Steps 61 – 64 (for emblem badge without the radar).
 61. Remove the screws securing the emblem badge.
62. Remove the emblem badge.

- Trim the protruding parts from the emblem badge.
- Install the emblem badge on grill surface (pos.2). Install grill (pos.2) on brackets (pos. 12-15), using screw M6x20 (pos. G) and washer 6mm (pos. L).
Steps 65-67 (for emblem badge with the radar).

65. Remove the screws securing the emblem badge.
66. Remove the emblem badge.

- Trim the protruding parts from the emblem badge.
- Push the emblem badge to grill surface (pos.2) as shown on photo. Mark contour line.

- Make a cutout, then trim the sharp edges and mounts the emblem badge.
- Install the emblem badge on grill surface (pos.2). Install grill (pos.2) on brackets (pos. 12-15), using screw M6x20 (pos. G) and washer 6mm (pos. L).
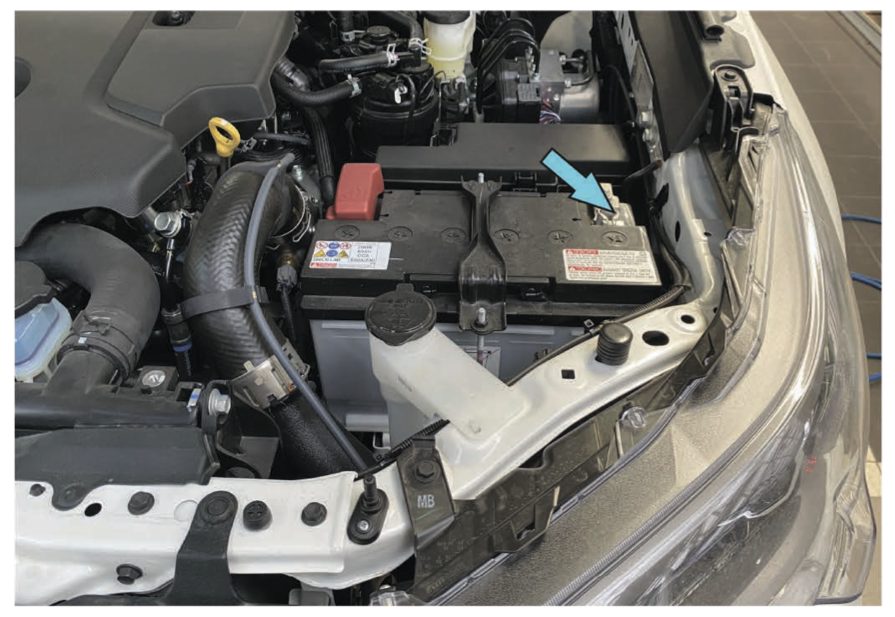
71. Connect terminal”-” of the battery.
Before operating a vehicle fitted with RIVAL Bumper 2D.5722.1-NL:
- – make sure all fittings are tightened
- – check winch operation
- – check all electrical wiring attached to lights
About Rival:
Rival is a premium brand, spread internationally:
- 730 employees;
- 10,000 M2 of storage space;
- 27,000 M2 of production space;
- 30 engineers in the R&D department;
- 2 factories: IATF 16949: 2016, ISO 14001: 2015, ISO 9001: 2015.
- 2 global logistics centers in Bremen Germany and Houston Texas.
In Romania and Bulgaria, Rival products are officially distributed by Best Ride.

The product can be purchased by accessing the following link: www.bestride.ro

